

Showing posts with label crafts. Show all posts
Showing posts with label crafts. Show all posts
Thursday, June 20, 2013
sewing for you :)
Sunday, June 9, 2013
magnetic diorama

Last week we received some beautiful hand-me-down toys. One of them was a simple road-themed shape puzzle. Although my son is a little too old for this type of puzzle, I gave it to him because the vehicles were so nice. He really liked arranging the vehicles outside the puzzle on our coffee table, especially making the tow truck tow the others. We tried putting magnets on the backs so he could arrange them on the fridge instead and it worked out really well. He had a lot of fun with it and it only took a few minutes to make. A couple of the pieces were missing from the vintage puzzle, so I felt alright about repurposing the pieces.
We used a glue gun because it's so fast. Otherwise regular glue, or wood glue left overnight will work.
Craft stores, dollar stores and stationery stores all carry small magnets.
Sunday, June 2, 2013
free summer hat patterns for children — notes
This month I tried out a couple of free patterns for children's summer hats and these are my pattern notes. Links and details are below. They are both available online. Making a summer hat is surprisingly easy, these each took about 3 hours. For a fast sewer, probably more like 1 and 1/2 to 2 hours.
Materials for both hats
—about 1/3 yard of medium-weight cotton or linen fabric for one side
—about 1/3 yard of a contrasting fabric
—sewing machine, thread, etc.
—1/2 a yard medium weight sew-in interfacing


Reversible Bucket Hat by Oliver + S
Available from Oliver + S
Unisex
Sizes available: 6–12 month, 12–24 month, 3–5 years and 6–8 years
Time: for me this was 4 hours from beginning to end. I am not a very fast sewer.
I made this hat first in the 3–5 year size using a lightweight cotton canvas by Daiwabo for one side — you can find it here — and a plain cotton poplin on the reverse. I didn't worry too much about making it truly reversible and let the crown of the interior be a little bumpy.
The sizing is good, running toward the small. I'm not sure if this will still fit my son when he's 5, but it fits his 4 year-old head pretty well.
Good features: the pattern has very comprehensive directions with clear diagrams, good for a confident beginner. It is in inches and is in English.

Baby/Boy's hat from By Miekke
Available from Miekke Patroon: direct link to pattern PDF and instructions at her blog
Boys
Sizes available: my approximations are "Baby" 6–12 month (45 cm, 17 and 3/4 inches), "Dreumes" 12–24 month (48 cm, 18 and 7/8 inches, "Peuter" 3–5 years (51 cm, 20 inches) and "Kleuter" 6–8 years (20 and 7/8 inches). Each size includes a 1 cm seam allowance. Definitely measure your child's head before selecting one of these.
Time: 2–3 hours
I made this in the "Peuter" size. Which was a good fit for 3–5. My son picked this leaf pattern out from some scraps of lightweight canvas I had, I think it's by Kokka.
So, this pattern is in Dutch. I don't speak Dutch. I copied and pasted her blog post into google translate and it was quite straightforward to follow the directions. I don't want to post her instructions on our blog, however, if you need help, please email me at windyandfriends at gmail dot com.
Good features: This is actually a much simpler pattern than the Oliver + S pattern, however, it is presented in a more informal way. For boys I do love the straight brim of this design.
Modifications: I used interfacing on the brim, but the pattern doesn't call for it — I just wanted a stiff brim.

Sunday, May 26, 2013
kitchen sink crafts
Last week we took out a book of arts + crafts projects from the library called "Create with Maisy". My son found two projects he wanted to try: "making a food picture" and "paper lanterns". There are now paper lanterns (if you'd like to make some you'll find more here) all over our place now. The project I photographed was the food picture. We live in a fairly small space, so I like any craft project that allows carefree messiness which can be easily vaccuumed. The Maisy book has a different version of this classic project than the one below, which is also very good.

This is such a simple project, you've probably done it many times! I put out some small bowls on the table (a muffin tin would also work well) and some open cannisters of dried foods. Then I gave my son, aged 3, a small 1/8 cup measuring scoop. He could scoop a full measure of any of them into the bowls. This was a really fun part of the project for him. When he was done, I put away the canisters, put a big pad of paper onto the table and gave him some washable children's glue (the kind with the squirty top).
I arranged the little bowls around the paper and made sure everything was in reach. I also gave him a wet cloth to wipe the glue off his hands and left him to it.
Setting up crafts and making them comfortable has become a big priority here: as low stress as possible for both of us. Having a wet cloth next to his work was really helpful. He didn't need to stop to ask for help from me or become frustrated. He knew what to do when his hands became uncomfortably sticky. The other thing I found helpful was only giving him items that could be easily vaccuumed or picked up. If we were in the backyard, turmeric or cinnamon would have been really fun to use, but we used lentils, pasta, bay leaves, rice, pumpkin seeds and other things that are easy to clean up.

Please let us know if you have any good tips for keeping your craft times relaxed and autonomous, we'd love to hear them.
Sunday, April 7, 2013
South Pointe Academy
Recently we did another “Windy” school visit to South Pointe Academy in Tsawwassen. After reading Snowy & Chinook, two kindergarden classes wrote and illustrated their own Windy-inspired story about a trip to the Animal History Museum. Here are some of the amazing animals they made for their story. Can you see which is the elephant, bunny, fish, penguin, leopard and dinosaur?


Sunday, February 10, 2013
Happy New Year
It's lunar New Year, would you like to make some noise to celebrate?
To make a very basic shaker, here is our set of instructions from Sunny below. If you are stuck inside, rice makes a softer sound :) A cup from a coffee shop with a lid is the easiest. You can tape or staple two paper cups or paper bowls together.
 If you'd like to do a fancier noisemaker, you could make this lovely hand drum from pichouline via bloesem kids.

To make a very basic shaker, here is our set of instructions from Sunny below. If you are stuck inside, rice makes a softer sound :) A cup from a coffee shop with a lid is the easiest. You can tape or staple two paper cups or paper bowls together.


Saturday, November 17, 2012
owl cabled gloves


I did some sizing adjustments to make a pair of these for a toddler. My pattern notes, materials and sources are here at my notebook.
Saturday, November 3, 2012
making a truck costume

Halloween is done and dusted for another year. But I know next year there will be a new crop of mums & dads making vehicle costumes out of cardboard boxes and so I put together some notes on ours. It's definitely easier to figure out homemade costumes in this blogging age — we quickly looked at a handful of truck costumes before making our yellow tractor trailer costume and it definitely sped it up.
One thing we did which turned out to be really fun (and useful and safety-ish) was adding headlights, reflectors and headlights. We did the whole thing very cheaply and fairly quickly.
My notes are here. I've put a few more pictures after the jump. As usual Auggie looks very serious while holding still and all the smiling shots are super blurry ^_^
Saturday, September 8, 2012
In a pickles

I tried out a pattern via pinterest from pickles — small and clever baby set (free pattern). The bonnet is very sweet and a pleasure to knit. It fits a little small, so I added in a few extra rows.


Saturday, August 25, 2012
Snufkin hats

Snufkin, the vagabond and philosopher, arrives each spring to Moominvalley to set up camp, fish, and comfort the small creatures of Moominvalley. He is always wearing a green hat, sometimes decorated with flowers and sometimes with feathers.

If you would like to make your own Snufkin hat, you can use this Pilgrim's hat template, using green paper instead of black. Then decorate. Instead of gluing the headband, we cut notches like this.


Make your hat soon. At the first sign of autumn, Snufkin slips away from the valley and doesn't return until spring comes again.

Saturday, July 21, 2012
ringo atelier


Ringo atelier is a creative studio, and resource, for children and their blog is lovely, too. Lots of their drawing activities have a PDF to print out and do at home. They have loads of pages to colour and develop, like this invent the fruit that goes with this leaf, which we tried yesterday during a rainy day

and this construct a city (this one is meant to be for collage, but we painted and scribbled them)

There are also some really great projects that we haven't yet tried, like the à la manière de section, with projects inspired by the work of artists like David Hockney or Sonia Delaunay. I think the David Hockney one is perfect for July, and I will put in a little translation here (find the original project here). Observe water (in your bath, swimming pool, by the sea or edge of a lake...), in the style of painter David Hockney. Have fun trying to reproduce the waves, the reflections, the colour of the water. To do this, use watered-down paint, sponges, tissues and different papers. Look carefully at this painting of a swimming pool (below, left)

The 1 livre—1 book section has a nice library of books, too.

Saturday, July 7, 2012
Lucky star necklace


Noodling around with lucky star necklaces and garlands with black and kraft paper strips ordered from the origami resource centre with knotted linen thread. These would be pretty at Christmas, too.

Every time I make these I sing the Madonna song in my head, it is impossible not to — I just think of you and I start to glow and I need your light and, baby, you know.

Glow-in-the-dark lucky star papers. Maybe we'll save them for halloween.
Saturday, June 9, 2012
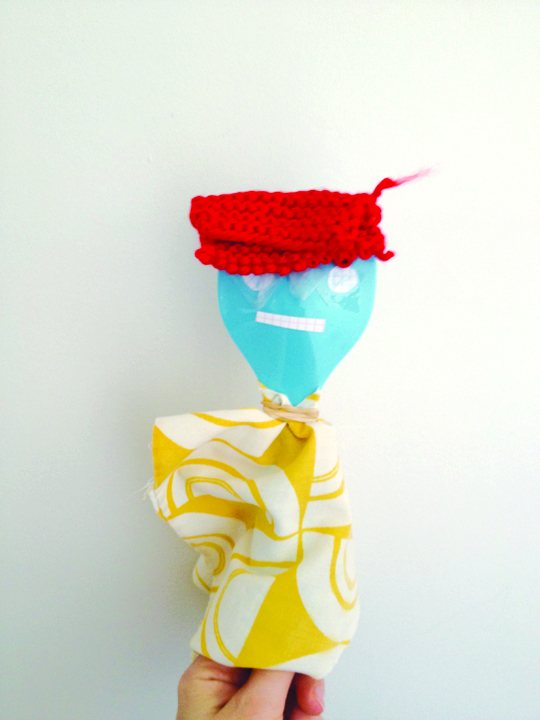
The pineapple bird

Ooh, ok, I think this is a pretty good one. We found a video on youtube called Jim Henson on Making Muppets, 1969, from Iowa Public Television. Jim Henson shows children how to make puppets from household objects like socks, potatoes, spoons and tennis balls. It is great!

Augs and I watched it together and then gathered up some materials and made a handful of puppets and little movies.

The dish mop lion, Auggie was very excited to make a pink scarf for the lion because "he was cold".

Wooden spoon puppet.

The pineapple bird. I put on the eyes and Auggie did the nose with a sharpie. By the way, he was horrified by the feeling of his finger in the potato, so we poked a pencil in the bottom and he could hold that instead. I don't have a picture, though — this is my finger. The pineapple bird is the only one who received a name from the Augs, he is special.

I had a bunch of yarn and old knitting swatches out, so these plastic spoon guys have scraps of yarn and a knitting swatch taped on as hair (or hat?). I cut out circles and rectangles out of sticky labels from my studio and gave them to Augs for the faces to colour and place. He was incredibly careful about placing them evenly on the face — he really likes some things to be straight and even. This is an aside, but I was very slightly concerned about how careful he is with crafts, as I don't want him to feel pressured while he makes things — however, yesterday he created a new technique of covering his hands in different colours of ink, yelling "sputz, sputz, sputz" (and also, "look at my fancy nails") and making crazy fingerprint paintings, so I think he's not turning into too much of a perfectionist and it's all ok. Phew.

My favourite part of this guy are the pieces of tape Auggie put over each eye — they are "goggles". Ha!

Saturday, May 19, 2012
Gift box ukelele

Here's a version of the shoebox guitar activity (instructions at link) from Sunny. We used a sturdy little giftbox and some paper straws. Auggie had some trouble with the elastic bands so I did that for him, and I cut out the hole with an exacto knife. I think within a year he could tackle this project on his own with safety scissors, but not today. He really loves colouring on black paper so lucky for us we had a black gift box in the closet.
Friday, May 4, 2012
Happy day
It's cinco de mayo tomorrow...


Make a pull piñata garland, love + cupcakes via pinterest

My favourite piñata by lieschenmueller flickr, via pinterest

You could make a fruit balloon garland, oh happy day via pinterest

Make a pull piñata garland, love + cupcakes via pinterest

My favourite piñata by lieschenmueller flickr, via pinterest
Sunday, April 29, 2012


Subscribe to:
Posts (Atom)